涵盖 Whisper 微调、说话人分离以及多种 ASR 模型对比评估的综合研究报告。
作者:Linchuan Du 单位:The University of British Columbia 数学系 日期:2023年8月
摘要
自动语音识别(ASR),也称为语音转文字(STT),利用深度学习技术将含有语音的音频转录为文字。大语言模型(LLM)模拟人脑处理词语和短语的方式,具备理解和生成文本数据的能力。LLM 通常包含数百万个权重,并使用各类数据集进行预训练。ASR LLM 通过特征提取和分词(tokenization)将音频输入转换为所需的输入格式。
为了定制具有理想性能的 ASR LLM,我们首先在 Google Colaboratory 上测试了 OpenAI 开发的 Whisper 微调流程。随后将较大模型部署到配备 GPU 的 Windows 环境中,以加速训练并缓解 Colab 和 macOS 上的 GPU 限制问题。我们基于音频质量和转录准确性等信息对音频数据的可靠性进行了评估,并通过数据预处理和超参数调优技术改进和优化了模型。当常规微调无法解决 GPU 内存问题时,采用了基于 LoRA 的参数高效微调(PEFT),冻结大部分参数以节省内存,同时尽量减少性能损失。
我们还探索了利用 Neural Speaker Diarization 为 Whisper 添加多说话人支持的可能性。通过 Pipeline 和 WhisperX 实现了与 Pyannote 的集成。WhisperX 提供了词级时间戳和语音活动检测(VAD)等额外功能。
除 Whisper 外,我们还安装并比较了具有 ASR 功能的其他模型,包括 Meta AI 的 MMS、PaddleSpeech、SpeechBrain 和 ESPNet。使用中文数据集进行了 CER 指标的比较评估。此外,还引入了 Azure AI 的 Custom Speech 进行实时 STT 性能对比(主要针对普通话)。
内容概览
本研究涵盖的主题:
- 环境搭建 - Google Colab、Anaconda、VS Code、CUDA GPU
- 音频数据源 - Hugging Face、OpenSLR 数据集
- Whisper 微调 - 微调、基于 LoRA 的 PEFT、结果
- 说话人分离 - Pyannote.audio、WhisperX
- 其他模型 - Meta MMS、PaddleSpeech、SpeechBrain、ESPnet
- Azure Speech Studio - Custom Speech 训练与部署
1. 环境搭建
a. Google Colaboratory
Google Colaboratory 是一个提供有限免费 GPU/TPU 计算资源的托管 Jupyter Notebook 服务,使用 ipynb 格式编辑和执行 Python 脚本。
通过 Google 账号登录,可以通过页面右上角的"分享"功能与他人共享脚本,也可以选择与 GitHub 账号关联。
在 Colab 上搭建环境:
- 选择 Runtime 标签 → Change Runtime 以启用 GPU
- 使用 pip 等包安装器安装必要的依赖
| |
b. Anaconda
除了 Colab,也可以在本地 PC 上搭建环境。Anaconda 是数据科学领域广泛使用的发行平台,支持 Python 数据分析和机器学习模型构建,内含环境和包管理器 Conda。
使用 Anaconda 搭建环境:
- 从 Anaconda 下载安装并添加到 PATH 环境变量
- 打开命令提示符进入 base 环境(示例:Windows)
| |
- 创建新的 Conda 环境
| |
- 根据需要激活/取消激活 Conda 环境
| |
- 通过 PyPI 或 Conda 包管理器安装依赖
| |
提示: 更多 Conda 命令请参阅 https://conda.io/projects/conda/en/latest/commands
c. Visual Studio Code
Visual Studio Code(VS Code)是一款适用于 Windows、macOS 和 Linux 的强大源代码编辑器,支持多种编程语言,具备调试、集成终端执行、扩展功能和 Git 版本控制等能力。
在 VS Code 中搭建环境:
- 在 EXPLORER 中打开文件夹并创建文件
- 在右下角选择所需环境,使用安装了 IPython 内核的交互式窗口运行,或通过命令执行 Python 脚本
| |
- 也可以使用 ipynb 格式(Jupyter Notebook)
- 左侧面板的 Git 图标用于源代码管理
提示: 如果环境中的包发生更新,需要重新打开 VS Code。
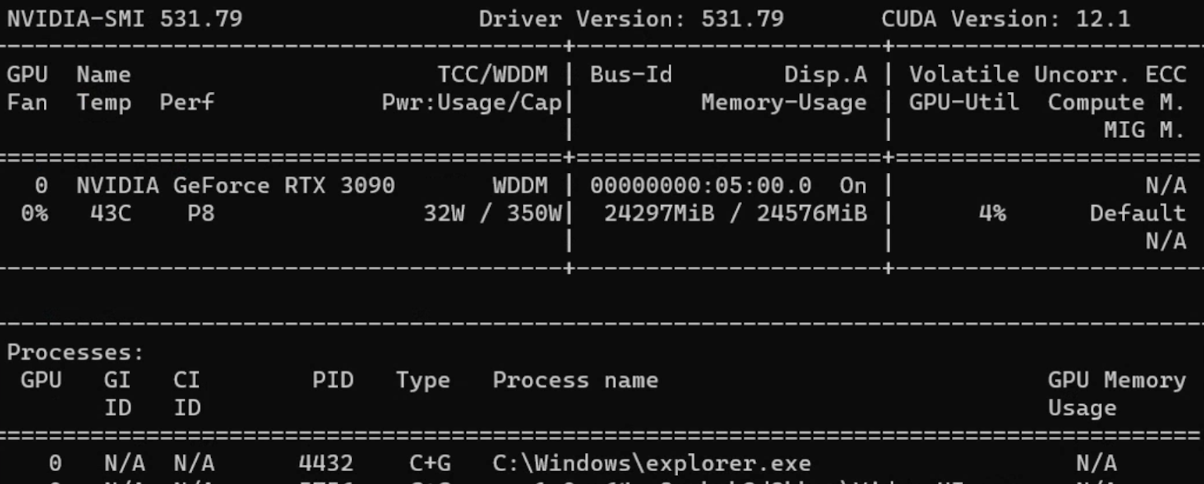
d. CUDA GPU
CUDA(Compute Unified Device Architecture)是 NVIDIA 开发的并行计算平台和 API,允许开发者利用 NVIDIA GPU 进行各种计算任务。
使用 CUDA GPU:
- 安装 CUDA Toolkit
- 在命令提示符中查看相关信息
| |
配置好 CUDA Toolkit 后,从 PyTorch 下载兼容 GPU 的版本。
提示: 如需旧版 PyTorch,请在 Previous PyTorch Versions 查阅正确的安装命令。
可以在 Python 中直接验证版本信息:
| |
2. 音频数据源
a. Hugging Face
Hugging Face 是一家专注于自然语言处理(NLP)和人工智能的公司与开源平台。
创建账号后可以使用已发布的模型或上传自定义模型。READ 和 WRITE 令牌可在 https://huggingface.co/settings/tokens 创建。
常见 ASR LLM 信息:
| 模型 | 参数量 | 支持语言 | 任务 | 架构 |
|---|---|---|---|---|
| OpenAI Whisper | large-v2 1550M | 大多数语言 | 多任务 | Transformer encoder-decoder Regularized |
| OpenAI Whisper | large 1550M | 大多数语言 | 多任务 | Transformer encoder-decoder |
| OpenAI Whisper | medium 769M | 大多数语言 | 多任务 | Transformer encoder-decoder |
| OpenAI Whisper | small 244M | 大多数语言 | 多任务 | Transformer encoder-decoder |
| guillaumekln faster-whisper | large-v2 | 大多数语言 | 多任务 | CTranslate2 |
| facebook wav2vec2 | large-960h-lv60-self | 英语 | 转录 | Wav2Vec2CTC decoder |
| facebook wav2vec2 | base-960h 94.4M | 英语 | 转录 | Wav2Vec2CTC decoder |
| facebook mms | 1b-all 965M | 大多数语言 | 多任务 | Wav2Vec2CTC decoder |
常见音频数据集:
| 数据集 | 时长/规模 | 支持语言 |
|---|---|---|
| mozilla-foundation common_voice_13_0 | 17689 已验证小时 | 108种语言 |
| google fleurs | 每种语言约12小时 | 102种语言 |
| LIUM tedlium | 3个版本共118至452小时 | 英语 |
| librispeech_asr | 约1000小时 | 英语 |
| speechcolab gigaspeech | 10000小时 | 英语 |
| PolyAI minds14 | 8.17k条 | 14种语言 |
注意: PolyAI/minds14 主要用于意图检测任务,不适合 ASR 用途。
b. Open SLR
Open SLR 是另一个实用的网站,以压缩文件形式托管语音和语言资源。可在 Resources 标签页查看各类音频数据集的概要信息。
中文 ASR 音频数据集:
| 数据集 | 时长(规模) | 说话人数 | 转录准确率 |
|---|---|---|---|
| Aishell-1 (SLR33) | 178小时 | 400 | 95%以上 |
| Free ST (SLR38) | 100小时以上 | 855 | / |
| aidatatang_200zh (SLR62) | 200小时 | 600 | 98%以上 |
| MAGICDATA (SLR68) | 755小时 | 1080 | 98%以上 |
3. Whisper 模型微调
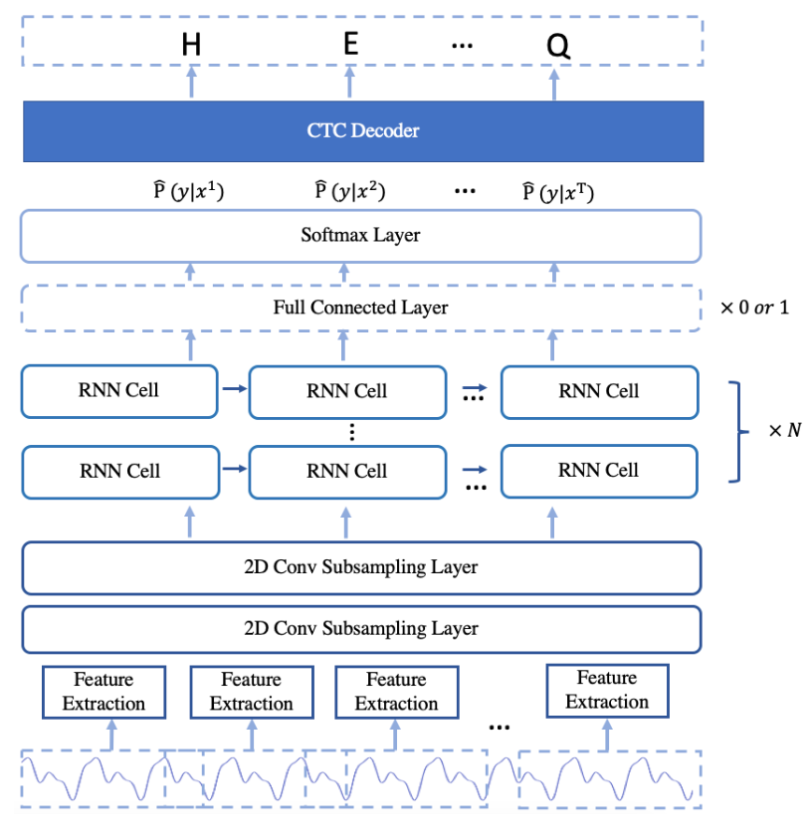
Whisper 是 OpenAI 于 2022 年 9 月发布的 ASR 系统,使用 680,000 小时的多语言和多任务监督数据进行训练,支持多语言转录和翻译。架构为编码器-解码器 Transformer。
音频被分割为 30 秒的片段,转换为 log-Mel 频谱图后输入编码器。
参考资料:
a. 在 Colab 上微调
步骤 1: 使用 Hugging Face 令牌登录以启用数据集下载
| |
步骤 2: 通过 load_dataset 加载数据集
提示: 某些数据集可能需要在 Hugging Face 上获取访问权限。
步骤 3: 预处理数据以供 Whisper 使用:
- 列操作:如
remove_columns、cast_column - 转录文本归一化:大小写、标点符号、特殊标记
- 使用 Datasets 库中的 Audio 将采样率更改为 16k
- 从 transformers 库加载预训练的特征提取器和分词器
| |
提示: AutoProcessor 可自动检测处理器类型。
在分词器中通常需要指定目标语言和任务:
| |
步骤 4: 定义带有标签填充的 Sequence to Sequence Data Collator
| |
步骤 5: 导入评估指标(WER)
| |
提示: 对于英语和大多数欧洲语言,WER(Word Error Rate)是评估转录准确度的常用指标。
WER 公式: WER = (替换数 + 删除数 + 插入数) / 参考文本总词数
步骤 6: 设计指标计算函数
| |
步骤 7: 加载条件生成模型并配置
| |
步骤 8: 在 Seq2SeqTrainingArguments 中定义超参数
| |
步骤 9: 使用 trainer.train() 开始训练
| |
处理 CUDA 内存不足(OOM)错误:
- 首选方案: 减小批次大小(配合 gradient accumulation 使用)
- Gradient checkpointing: 以少量计算时间换取大幅内存节省
- 混合精度训练: 在保持训练稳定性的同时减少内存占用
- 清除 GPU 缓存:
| |
提示: 如果以上方法都无效,切换到更小的模型是最后的选择。
b. 数据预处理
Hugging Face 数据集
使用 load_dataset 函数加载数据集:
| |
提示: 磁盘空间有限或不需要下载完整数据集时,可使用
streaming=True。
将采样率更改为 Whisper 架构要求的 16kHz:
| |
转录文本清洗
| |
| |
c. 微调结果
缩写说明:
- lr = learning rate, wd = weight decay, ws = warmup steps
- ms = max steps, #e = number of epochs
- es = evaluation strategy, ml = max length
- tbz = train batch size, ebz = eval batch size
- #ts = train sample size, #es = eval sample size
| 数据集/规模/划分 | 模型/语言/任务 | 超参数 | 结果 |
|---|---|---|---|
| common_voice_11_0 #ts=100, #es=100 train/test | Whisper small Hindi Transcribe | lr=1e-5, wd=0, ws=5, ms=40, es=steps, ml=225, tbz=4, ebz=8 | WER: 67.442% |
| common_voice_11_0 #ts=500, #es=500 train+validation/test | Whisper small Hindi Transcribe | lr=1e-5, wd=0, ws=0, ms=60, es=steps, ml=50, tbz=16, ebz=8 | WER: 62.207% |
| common_voice #ts=3500, #es=500 train+validated/validation | Whisper small Japanese Transcribe | lr=1e-6, wd=0, ws=50, ms=3500, es=steps, ml=200, tbz=16, ebz=8 | WER: 2.4% |
| librispeech_asr #ts=750, #es=250 train.100/validation | Whisper medium English Transcribe | lr=1e-5, wd=0.01, ws=10, ms=750, es=steps, ml=80, tbz=1, ebz=1 | WER: 13.095% |
注意: 日语是基于字符的语言,因此字符错误率(CER)是更合适的评估指标。
d. 基于 LoRA 的 PEFT
参数高效微调(PEFT)仅微调少量模型参数,同时冻结预训练 LLM 的大部分参数,大幅降低计算和存储成本。
**LoRA(Low Rank Adaptation)**将预训练模型的权重分解为低秩矩阵,显著减少需要微调的参数数量。
| |
PEFT 训练参数:
| |
PEFT 结果:
| 数据集/规模/划分 | 模型/语言/任务 | 超参数 | 结果 |
|---|---|---|---|
| common_voice_13_0 #ts=1000, #es=100 train+validation/test | Whisper medium Japanese Transcribe | lr=1e-3, wd=0, ws=50, #e=3, es=steps, ml=128, tbz=8, ebz=8 | WER: 73%, NormWER: 70.186% |
| common_voice_13_0 #ts=100, #es=30 train+validation/test | Whisper large-v2 Vietnamese Transcribe | lr=1e-4, wd=0.01, ws=0, #e=3, es=steps, ml=150, tbz=8, ebz=8 | WER: 26.577%, NormWER: 22.523% |
提示: PEFT 参考资料:
e. 损失曲线可视化
| |
需要关注的模式:
- 过拟合: 训练损失低但验证损失高
- 欠拟合: 训练损失和验证损失都很高
- 平滑性: 平滑的曲线表示训练过程稳定
- 损失停滞: 模型难以从现有数据中继续学习
f. 基线结果
| 数据集/划分/规模 | 模型/任务 | 结果 |
|---|---|---|
| distil-whisper/tedlium-long-form test | Whisper medium baseline en→en | WER: 28.418% |
| distil-whisper/tedlium-long-form validation | Whisper large-v2 baseline en→en | WER: 26.671% |
| librispeech_asr clean test | Whisper large-v2 baseline en→en | WER: 4.746% |
| Aishell S0770 test #353 | Whisper large-v2 baseline zh-CN→zh-CN | CER: 8.595% |
| Aishell S0768 test #367 | Whisper large-v2 baseline zh-CN→zh-CN | CER: 12.379% |
| MagicData 38_5837 test #585 | Whisper large-v2 baseline zh-CN→zh-CN | CER: 21.750% |
4. 说话人分离
说话人分离(Speaker Diarization)是将语音音频按不同说话人进行分段的技术,目标是识别和区分音频流中的各个说话人。
a. Pyannote.audio
Pyannote.audio 是用于说话人分离、语音活动检测和话语轮次分割的开源工具包。
将 Pyannote.audio 与 Whisper 配合使用:
| |
| |
| |
b. WhisperX
WhisperX 集成了 Whisper、音素模型(Wav2Vec2)和 Pyannote.audio。它声称在实时语音识别上比 Whisper large-v2 快 70 倍,并提供词级时间戳和 VAD 功能的说话人分离。
| |
| |
提示: 各自的优势:
- WhisperX: 多说话人场景、VAD、额外音素模型、更便于处理本地音频
- Whisper Pipeline: 支持更多语言、灵活的分块长度(30秒以下)、更便于处理 HF 数据集
WhisperX 结果:
| 数据集 | 模型/任务/计算类型 | 结果 |
|---|---|---|
| TED LIUM 1st release SLR7 test | WhisperX medium en→en int8 | WER: 37.041% |
| TED LIUM 1st release SLR7 test | WhisperX large-v2 en→en int8 | WER: 36.917% |
| distil-whisper/tedlium-long-form validation | WhisperX large-v2 en→en int8 batch_size=1 | WER: 24.651% |
| distil-whisper/tedlium-long-form validation | WhisperX medium en→en int8 batch_size=1 | WER: 24.353% |
| AISHELL-4 selected audio file | WhisperX manual check | CER: 15.6%~24.658% |
5. 其他模型
a. Meta MMS
Meta AI 的 Massively Multilingual Speech(MMS)项目将语音技术的支持语言从约 100 种扩展到 1,100 多种。
| |
b. PaddleSpeech
PaddleSpeech 是 PaddlePaddle 平台上的中文开源工具包,支持 DeepSpeech2、Conformer 和 U2(Unified Streaming and Non-streaming)等架构。详情请参阅功能列表。
| |
| |
提示: Linux 上的 ASR 训练教程:asr1
c. SpeechBrain
SpeechBrain 是蒙特利尔大学开发的开源对话式 AI 工具包。
| |
| |
d. ESPnet
ESPnet 是一个涵盖语音识别、文本转语音、语音翻译和说话人分离的端到端语音处理工具包。
| |
| |
e. 基线结果对比
英语:
| 数据集 | 模型/方法 | WER |
|---|---|---|
| librispeech_asr clean | Meta MMS mms-1b-all | 4.331% |
| common_voice_13_0 #1000 | Meta MMS mms-1b-all | 23.963% |
中文:
| 数据集 | 模型/方法 | CER |
|---|---|---|
| Aishell S0770 #353 | PaddleSpeech Default (conformer_u2pp_online_wenetspeech) | 4.062% |
| Aishell S0768 #367 | SpeechBrain wav2vec2-transformer-aishell | 8.436% |
| Aishell S0768 #367 | Meta MMS mms-1b-all | 34.241% |
| MagicData 4 speakers #2372 | PaddleSpeech conformer-wenetspeech | 9.79% |
| MagicData 4 speakers #2372 | SpeechBrain wav2vec2-ctc-aishell | 15.911% |
| MagicData 4 speakers #2372 | Whisper large-v2 baseline | 24.747% |
核心发现: 在中文推理方面,PaddleSpeech 的性能优于 Whisper,而 Meta MMS 的中文转录结果则不如 Whisper。
6. Azure Speech Studio
Azure AI Speech Services 是 Microsoft Azure 提供的一组基于云的语音相关服务。可以在 Speech Studio 中创建不同语言的 Custom Speech 项目。
a. 上传数据集
上传训练和测试数据集有三种方式:
- Speech Studio(直接上传)
- REST API
- CLI 使用
Azure Blob Storage:
| |
音频格式要求:
- 格式:WAV
- 采样率:8kHz 或 16kHz
- 声道:单声道
- 压缩:ZIP 格式,2GB 以内,10,000 个文件以内
b. 模型训练与部署
| |
c. Azure 结果
| 测试数据集 | 训练数据集 | 错误率(自定义 / 基线) |
|---|---|---|
| MagicData 9452 11:27:39s | Aishell 12小时以上 | 4.69% / 4.24% |
| MagicData 9452 11:27:39s | Aishell+Minds14 32小时以上: 1小时以上 | 4.67% / 4.23% |
| MagicData+Aishell+CV13 8721 11:45:52s | Aishell+CV13 8小时以上: 7小时以上 | 2.51% / 3.70% |
| MagicData+Aishell+CV13 8721 11:45:52s | Aishell+CV13+Fleurs 8小时以上: 7小时以上: 9小时以上 | 2.48% / 3.70% |
注意: 最优 Azure 模型使用 AISHELL-1、mozilla-foundation/common_voice_13_0 和 google/fleurs 训练,达到了 2.48% 的错误率。
7. 展望
核心发现与未来方向:
- 数据源: 具有高质量转录的中文语音数据远少于英语
- 硬件限制: 多 GPU 训练或更高端 GPU(NVIDIA 40 系列)有助于在更大模型上取得更好结果
- LoRA 配置: 不同 LoRA 参数对 PEFT 模型性能的影响值得进一步探索
- 说话人分离: Pyannote.audio 与 Whisper 的集成显示出潜力,但在多说话人会议场景中的分离能力仍有待提升
- Azure Speech Services: 保持高音频质量和词级转录准确性至关重要。过滤低质量的训练音频文件可提升模型性能
8. 参考文献
- Anaconda, Inc. (2017). Command reference - conda documentation. conda.io/projects/conda/en/latest/commands
- OpenAI (2022, September 21). Introducing Whisper. openai.com/research/whisper
- Radford, A., Kim, J.W., Xu, T., Brockman, G., McLeavey, C., & Sutskever, I. (2022). Robust Speech Recognition via Large-Scale Weak Supervision.
- Gandhi, S. (2022, November 3). Fine-Tune Whisper for Multilingual ASR with Transformers. huggingface.co/blog/fine-tune-whisper
- The Linux Foundation (2023). Previous PyTorch Versions. pytorch.org/get-started/previous-versions
- Hugging Face, Inc. (2023). Hugging Face Documentations. huggingface.co/docs
- Srivastav, V. (2023). fast-whisper-finetuning. github.com/Vaibhavs10/fast-whisper-finetuning
- Mangrulkar, S., & Paul, S. (2023). Parameter-Efficient Fine-Tuning Using PEFT. huggingface.co/blog/peft
- Bredin, H., et al. (2020). pyannote.audio: neural building blocks for speaker diarization. ICASSP 2020.
- Bain, M., Huh, J., Han, T., & Zisserman, A. (2023). WhisperX: Time-Accurate Speech Transcription of Long-Form Audio. INTERSPEECH 2023.
- Meta AI (2023, May 22). Introducing speech-to-text, text-to-speech, and more for 1,100+ languages. ai.meta.com/blog/multilingual-model-speech-recognition
- Pratap, V., et al. (2023). Scaling Speech Technology to 1,000+ Languages. arXiv.
- Zhang, H. L. (2022). PaddleSpeech: An Easy-to-Use All-in-One Speech Toolkit. NAACL 2022.
- Ravanelli, M., et al. (2021). SpeechBrain: A General-Purpose Speech Toolkit.
- Gao, D., et al. (2022). EURO: ESPnet Unsupervised ASR Open-source Toolkit. arXiv:2211.17196.
- ESPnet (2021). espnet_model_zoo. github.com/espnet/espnet_model_zoo
- Microsoft (2023). Custom Speech overview - Azure AI Services. learn.microsoft.com/en-us/azure/ai-services/speech-service/custom-speech-overview
- Microsoft (2023). Speech service documentation. learn.microsoft.com/en-us/azure/ai-services/speech-service/