Whisper 파인튜닝, 화자 분리, 다양한 ASR 모델 비교에 대한 포괄적인 연구 보고서입니다.
저자: Linchuan Du 소속: The University of British Columbia 수학과 날짜: 2023년 8월
개요
자동 음성 인식(ASR)은 음성-텍스트 변환(STT)이라고도 하며, 딥러닝 기술을 사용하여 음성이 포함된 오디오를 텍스트로 변환하는 기술입니다. 대규모 언어 모델(LLM)은 인간의 뇌처럼 단어와 구문을 처리하며, 텍스트 데이터의 이해와 생성이 가능합니다. LLM은 보통 수백만 개의 가중치를 가지고 다양한 데이터셋으로 사전 학습됩니다. ASR LLM은 특징 추출과 토큰화를 통해 오디오 입력을 원하는 형식으로 변환합니다.
이상적인 성능의 ASR LLM을 구축하기 위해, OpenAI가 개발한 Whisper의 파인튜닝 절차를 먼저 Google Colaboratory에서 테스트했습니다. 이후 학습 속도 향상과 GPU 가용성 제한 해결을 위해 Windows OS의 GPU 탑재 환경으로 이전했습니다. 오디오 품질과 전사 정확도 등을 기반으로 데이터 신뢰성을 검증하고, 데이터 전처리 및 하이퍼파라미터 튜닝을 통해 모델을 개선했습니다. 일반 파인튜닝으로 GPU 메모리 문제를 해결할 수 없는 경우에는 LoRA를 활용한 파라미터 효율적 파인튜닝(PEFT)을 적용하여 대부분의 파라미터를 동결하고 메모리 사용량을 절감했습니다.
Neural Speaker Diarization을 활용한 Whisper의 다중 화자 지원 가능성도 탐구했습니다. Pyannote와의 통합을 파이프라인 및 WhisperX를 사용해 구현했습니다. WhisperX는 단어 수준 타임스탬프와 음성 활동 감지(VAD) 등의 기능을 제공합니다.
Whisper 외에도 Meta AI의 MMS, PaddleSpeech, SpeechBrain, ESPNet 등 ASR 기능을 갖춘 모델을 설치하여 Whisper 베이스라인과 비교했습니다. 중국어 데이터셋을 사용해 CER 지표로 비교 평가를 수행했으며, Azure AI의 Custom Speech를 통한 실시간 STT 기능과의 성능 비교(주로 중국어)도 진행했습니다.
전체 구성
본 연구에서 다루는 주제:
- 환경 구축 - Google Colab, Anaconda, VS Code, CUDA GPU
- 오디오 데이터 소스 - Hugging Face, OpenSLR 데이터셋
- Whisper 파인튜닝 - 파인튜닝, LoRA를 활용한 PEFT, 결과
- 화자 분리 - Pyannote.audio, WhisperX
- 기타 모델 - Meta MMS, PaddleSpeech, SpeechBrain, ESPnet
- Azure Speech Studio - Custom Speech 학습 및 배포
1. 환경 구축
a. Google Colaboratory
Google Colaboratory는 제한적인 무료 GPU/TPU 컴퓨팅 리소스를 제공하는 호스팅 Jupyter Notebook 서비스입니다. ipynb 확장자 형식으로 Python 스크립트를 편집하고 실행할 수 있습니다.
Google 계정으로 로그인하여 스크립트를 작성하고, 우측 상단의 “공유"로 다른 사람과 공유할 수 있으며, GitHub 계정과의 연동도 지원합니다.
Colab 환경 설정 방법:
- Runtime 탭 → Change Runtime에서 GPU 활성화
- pip 등의 패키지 설치 도구로 필요한 의존성 설치
| |
b. Anaconda
로컬 PC에서도 환경을 구축할 수 있습니다. Anaconda는 데이터 과학 분야에서 널리 쓰이는 배포 플랫폼으로, Python을 사용한 데이터 분석과 머신러닝 모델 구축을 지원합니다. 환경 및 패키지 관리 도구인 Conda가 포함되어 있습니다.
Anaconda 환경 설정 방법:
- Anaconda를 설치하고 PATH 환경 변수에 추가
- 명령 프롬프트에서 base 환경 진입 (예: Windows)
| |
- 새 Conda 환경 생성
| |
- 필요에 따라 Conda 환경 활성화/비활성화
| |
- PyPI 또는 Conda 패키지 관리자로 의존성 설치
| |
팁: 기타 Conda 명령어는 https://conda.io/projects/conda/en/latest/commands를 참고하세요.
c. Visual Studio Code
Visual Studio Code(VS Code)는 Windows, macOS, Linux를 지원하는 고성능 소스 코드 편집기입니다. 디버깅, 통합 터미널 실행, 확장 기능, Git 기반 버전 관리를 지원합니다.
VS Code 환경 설정 방법:
- EXPLORER에서 폴더를 열고 파일 생성
- 우측 하단에서 원하는 환경을 선택하고, IPython 커널이 설치된 인터랙티브 윈도우에서 실행하거나 명령으로 실행
| |
- ipynb 확장자(Jupyter Notebook)도 사용 가능
- 좌측 패널의 Git 아이콘으로 소스 코드 관리
팁: 환경의 패키지가 업데이트되면 VS Code를 재시작해야 합니다.
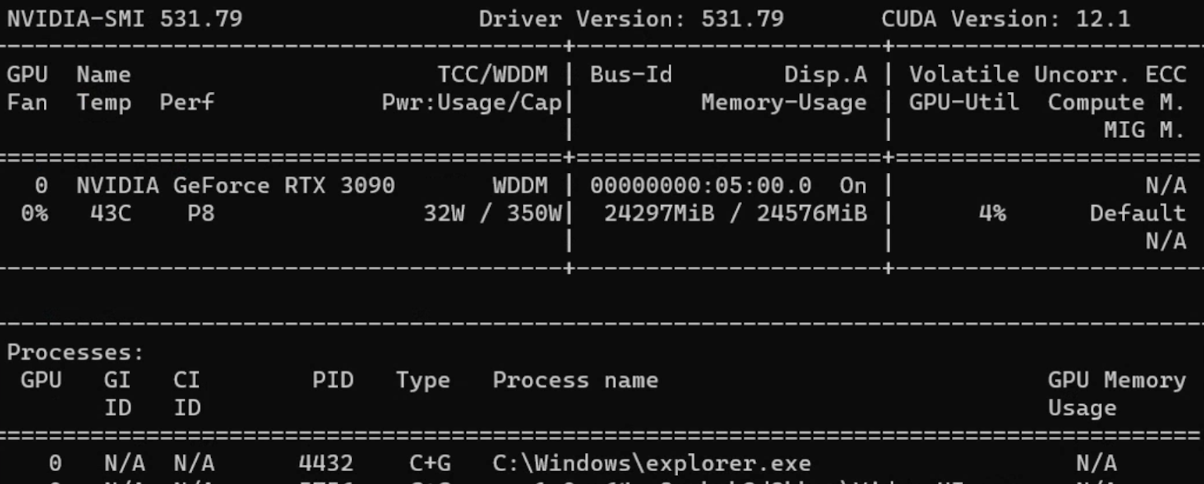
d. CUDA GPU
CUDA(Compute Unified Device Architecture)는 NVIDIA가 개발한 병렬 컴퓨팅 플랫폼 및 API입니다. NVIDIA GPU를 다양한 컴퓨팅 작업에 활용할 수 있습니다.
CUDA GPU 사용 방법:
- CUDA Toolkit 설치
- 명령 프롬프트에서 정보 확인
| |
CUDA Toolkit 설정 후 PyTorch에서 GPU 호환 버전을 다운로드합니다.
팁: 이전 버전의 PyTorch가 필요한 경우 Previous PyTorch Versions에서 올바른 명령어를 확인하세요.
Python에서 직접 버전을 확인할 수 있습니다.
| |
2. 오디오 데이터 소스
a. Hugging Face
Hugging Face는 자연어 처리(NLP)와 인공지능에 특화된 기업이자 오픈소스 플랫폼입니다.
계정을 생성하면 공개 모델 활용이나 커스텀 모델 업로드가 가능합니다. READ 및 WRITE 토큰은 https://huggingface.co/settings/tokens에서 생성합니다.
주요 ASR LLM 정보:
| 모델 | 파라미터 수 | 지원 언어 | 작업 | 구조 |
|---|---|---|---|---|
| OpenAI Whisper | large-v2 1550M | 대부분의 언어 | 멀티태스크 | Transformer encoder-decoder Regularized |
| OpenAI Whisper | large 1550M | 대부분의 언어 | 멀티태스크 | Transformer encoder-decoder |
| OpenAI Whisper | medium 769M | 대부분의 언어 | 멀티태스크 | Transformer encoder-decoder |
| OpenAI Whisper | small 244M | 대부분의 언어 | 멀티태스크 | Transformer encoder-decoder |
| guillaumekln faster-whisper | large-v2 | 대부분의 언어 | 멀티태스크 | CTranslate2 |
| facebook wav2vec2 | large-960h-lv60-self | 영어 | 전사 | Wav2Vec2CTC decoder |
| facebook wav2vec2 | base-960h 94.4M | 영어 | 전사 | Wav2Vec2CTC decoder |
| facebook mms | 1b-all 965M | 대부분의 언어 | 멀티태스크 | Wav2Vec2CTC decoder |
주요 오디오 데이터셋:
| 데이터셋 | 시간/규모 | 지원 언어 |
|---|---|---|
| mozilla-foundation common_voice_13_0 | 17689 검증 시간 | 108개 언어 |
| google fleurs | 언어당 약 12시간 | 102개 언어 |
| LIUM tedlium | 3개 릴리스에 118~452시간 | 영어 |
| librispeech_asr | 약 1000시간 | 영어 |
| speechcolab gigaspeech | 10000시간 | 영어 |
| PolyAI minds14 | 8.17k 행 | 14개 언어 |
주의: PolyAI/minds14는 주로 의도 감지 작업용이며, ASR 목적에는 적합하지 않습니다.
b. Open SLR
Open SLR은 압축 파일 형태로 음성 및 언어 리소스를 호스팅하는 유용한 웹사이트입니다. Resources 탭에서 다양한 오디오 데이터셋의 개요를 확인할 수 있습니다.
중국어 ASR용 오디오 데이터셋:
| 데이터셋 | 시간(규모) | 화자 수 | 전사 정확도 |
|---|---|---|---|
| Aishell-1 (SLR33) | 178시간 | 400 | 95% 이상 |
| Free ST (SLR38) | 100시간 이상 | 855 | / |
| aidatatang_200zh (SLR62) | 200시간 | 600 | 98% 이상 |
| MAGICDATA (SLR68) | 755시간 | 1080 | 98% 이상 |
3. Whisper 모델 파인튜닝
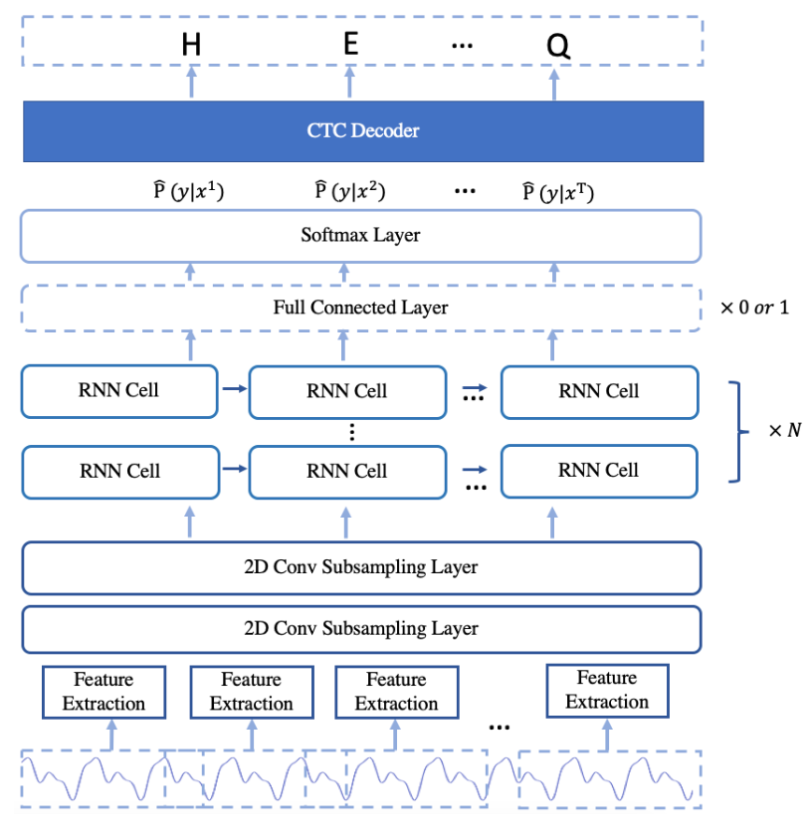
Whisper는 2022년 9월 OpenAI가 출시한 ASR 시스템입니다. 680,000시간의 다국어 및 멀티태스크 지도 데이터로 학습되어 다국어 전사와 번역이 가능합니다. 아키텍처는 인코더-디코더 Transformer입니다.
오디오는 30초 단위로 분할되어 log-Mel 스펙트로그램으로 변환된 후 인코더에 입력됩니다.
참고 자료:
a. Colab에서의 파인튜닝
단계 1: Hugging Face 토큰으로 로그인하여 데이터셋 다운로드 활성화
| |
단계 2: load_dataset으로 원하는 데이터셋 로드
팁: Hugging Face에서 특정 데이터셋에 대한 접근 권한이 필요할 수 있습니다.
단계 3: Whisper에 데이터를 공급하기 위한 전처리:
- 컬럼 조작:
remove_columns,cast_column등 - 전사 정규화: 대소문자, 구두점, 특수 토큰 처리
- Datasets 라이브러리의 Audio를 사용하여 샘플링 레이트를 16k로 변경
- transformers 라이브러리에서 사전 학습된 특징 추출기와 토크나이저 로드
| |
팁: AutoProcessor는 프로세서 유형을 자동으로 감지합니다.
토크나이저에서는 보통 대상 언어와 작업을 지정합니다.
| |
단계 4: 레이블 패딩을 포함한 Sequence to Sequence Data Collator 정의
| |
단계 5: 평가 지표(WER) 불러오기
| |
팁: 영어를 비롯한 대부분의 유럽어에서는 WER(Word Error Rate)이 전사 정확도의 일반적인 평가 지표입니다.
WER 공식: WER = (대체 + 삭제 + 삽입) / 참조문의 총 단어 수
단계 6: 메트릭 계산 설계
| |
단계 7: 조건부 생성 모델 로드 및 설정
| |
단계 8: Seq2SeqTrainingArguments에서 하이퍼파라미터 정의
| |
단계 9: trainer.train()으로 학습 시작
| |
CUDA Out of Memory(OOM) 오류 대처:
- 최우선: 배치 크기 축소 (gradient accumulation과 함께 사용)
- Gradient checkpointing: 약간의 계산 시간 증가로 메모리 사용량 대폭 감소
- 혼합 정밀도 학습: 학습 안정성을 유지하며 메모리 사용량 감소
- GPU 캐시 클리어:
| |
팁: 모든 방법이 실패하면 더 작은 모델로 변경하는 것이 마지막 수단입니다.
b. 데이터 전처리
Hugging Face 데이터셋
load_dataset 함수로 데이터셋을 불러옵니다.
| |
팁: 디스크 공간이 부족하거나 전체 데이터셋 다운로드가 불필요한 경우
streaming=True를 사용하세요.
Whisper 아키텍처가 요구하는 16kHz로 샘플링 레이트를 변경합니다.
| |
전사 텍스트 정리
| |
| |
c. 파인튜닝 결과
약어 설명:
- lr = learning rate, wd = weight decay, ws = warmup steps
- ms = max steps, #e = number of epochs
- es = evaluation strategy, ml = max length
- tbz = train batch size, ebz = eval batch size
- #ts = train sample size, #es = eval sample size
| 데이터셋/크기/분할 | 모델/언어/작업 | 하이퍼파라미터 | 결과 |
|---|---|---|---|
| common_voice_11_0 #ts=100, #es=100 train/test | Whisper small Hindi Transcribe | lr=1e-5, wd=0, ws=5, ms=40, es=steps, ml=225, tbz=4, ebz=8 | WER: 67.442% |
| common_voice_11_0 #ts=500, #es=500 train+validation/test | Whisper small Hindi Transcribe | lr=1e-5, wd=0, ws=0, ms=60, es=steps, ml=50, tbz=16, ebz=8 | WER: 62.207% |
| common_voice #ts=3500, #es=500 train+validated/validation | Whisper small Japanese Transcribe | lr=1e-6, wd=0, ws=50, ms=3500, es=steps, ml=200, tbz=16, ebz=8 | WER: 2.4% |
| librispeech_asr #ts=750, #es=250 train.100/validation | Whisper medium English Transcribe | lr=1e-5, wd=0.01, ws=10, ms=750, es=steps, ml=80, tbz=1, ebz=1 | WER: 13.095% |
참고: 일본어는 문자 기반 언어이므로 Character Error Rate(CER)이 더 적합한 평가 지표입니다.
d. LoRA를 활용한 PEFT
파라미터 효율적 파인튜닝(PEFT)은 사전 학습된 LLM의 대부분의 파라미터를 동결하고 소수의 파라미터만 파인튜닝하여, 계산 비용과 저장 비용을 크게 줄입니다.
**LoRA(Low Rank Adaptation)**는 사전 학습된 모델의 가중치를 저랭크 행렬로 분해하여 파인튜닝에 필요한 파라미터 수를 크게 줄입니다.
| |
PEFT 학습 파라미터:
| |
PEFT 결과:
| 데이터셋/크기/분할 | 모델/언어/작업 | 하이퍼파라미터 | 결과 |
|---|---|---|---|
| common_voice_13_0 #ts=1000, #es=100 train+validation/test | Whisper medium Japanese Transcribe | lr=1e-3, wd=0, ws=50, #e=3, es=steps, ml=128, tbz=8, ebz=8 | WER: 73%, NormWER: 70.186% |
| common_voice_13_0 #ts=100, #es=30 train+validation/test | Whisper large-v2 Vietnamese Transcribe | lr=1e-4, wd=0.01, ws=0, #e=3, es=steps, ml=150, tbz=8, ebz=8 | WER: 26.577%, NormWER: 22.523% |
팁: PEFT 참고 자료:
e. 손실 곡선 시각화
| |
확인할 주요 패턴:
- 과적합: 학습 손실은 낮지만 검증 손실이 높음
- 과소적합: 학습 손실과 검증 손실 모두 높음
- 매끄러움: 매끄러운 곡선은 안정적인 학습을 나타냄
- 손실 정체: 모델이 데이터에서 더 이상 학습하기 어려운 상태
f. 베이스라인 결과
| 데이터셋/분할/크기 | 모델/작업 | 결과 |
|---|---|---|
| distil-whisper/tedlium-long-form test | Whisper medium baseline en→en | WER: 28.418% |
| distil-whisper/tedlium-long-form validation | Whisper large-v2 baseline en→en | WER: 26.671% |
| librispeech_asr clean test | Whisper large-v2 baseline en→en | WER: 4.746% |
| Aishell S0770 test #353 | Whisper large-v2 baseline zh-CN→zh-CN | CER: 8.595% |
| Aishell S0768 test #367 | Whisper large-v2 baseline zh-CN→zh-CN | CER: 12.379% |
| MagicData 38_5837 test #585 | Whisper large-v2 baseline zh-CN→zh-CN | CER: 21.750% |
4. 화자 분리
화자 분리(Speaker Diarization)는 음성 오디오를 각 화자에 해당하는 구간으로 분할하는 기술입니다. 오디오 스트림에서 개별 화자를 식별하고 구분하는 것이 목표입니다.
a. Pyannote.audio
Pyannote.audio는 화자 분리, 음성 활동 감지, 발화 턴 분할을 위한 오픈소스 툴킷입니다.
Pyannote.audio와 Whisper 통합 사용법:
| |
| |
| |
b. WhisperX
WhisperX는 Whisper, 음소 기반 모델(Wav2Vec2), Pyannote.audio를 통합한 도구입니다. Whisper large-v2 대비 실시간 음성 인식에서 70배 빠르다고 하며, 단어 수준 타임스탬프와 VAD 기능이 포함된 화자 분리를 제공합니다.
| |
| |
팁: 각각의 장점:
- WhisperX: 다중 화자 시나리오, VAD, 추가 음소 모델, 로컬 오디오 처리 용이
- Whisper Pipeline: 더 많은 언어 지원, 유연한 청크 길이(30초 이하), HF 데이터셋 처리 용이
WhisperX 결과:
| 데이터셋 | 모델/작업/연산 타입 | 결과 |
|---|---|---|
| TED LIUM 1st release SLR7 test | WhisperX medium en→en int8 | WER: 37.041% |
| TED LIUM 1st release SLR7 test | WhisperX large-v2 en→en int8 | WER: 36.917% |
| distil-whisper/tedlium-long-form validation | WhisperX large-v2 en→en int8 batch_size=1 | WER: 24.651% |
| distil-whisper/tedlium-long-form validation | WhisperX medium en→en int8 batch_size=1 | WER: 24.353% |
| AISHELL-4 selected audio file | WhisperX manual check | CER: 15.6%~24.658% |
5. 기타 모델
a. Meta MMS
Meta AI의 Massively Multilingual Speech(MMS) 프로젝트는 음성 기술의 지원 언어를 약 100개에서 1,100개 이상으로 확대했습니다.
| |
b. PaddleSpeech
PaddleSpeech는 PaddlePaddle 플랫폼의 중국어 오픈소스 툴킷입니다. DeepSpeech2, Conformer, U2(Unified Streaming and Non-streaming) 등의 아키텍처를 지원합니다. 자세한 내용은 기능 목록을 참고하세요.
| |
| |
팁: Linux에서의 ASR 학습 튜토리얼: asr1
c. SpeechBrain
SpeechBrain은 몬트리올 대학교에서 개발한 대화형 AI 오픈소스 툴킷입니다.
| |
| |
d. ESPnet
ESPnet은 음성 인식, 텍스트-음성 변환, 음성 번역, 화자 분리를 지원하는 엔드투엔드 음성 처리 툴킷입니다.
| |
| |
e. 베이스라인 결과 비교
영어:
| 데이터셋 | 모델/방법 | WER |
|---|---|---|
| librispeech_asr clean | Meta MMS mms-1b-all | 4.331% |
| common_voice_13_0 #1000 | Meta MMS mms-1b-all | 23.963% |
중국어:
| 데이터셋 | 모델/방법 | CER |
|---|---|---|
| Aishell S0770 #353 | PaddleSpeech Default (conformer_u2pp_online_wenetspeech) | 4.062% |
| Aishell S0768 #367 | SpeechBrain wav2vec2-transformer-aishell | 8.436% |
| Aishell S0768 #367 | Meta MMS mms-1b-all | 34.241% |
| MagicData 4 speakers #2372 | PaddleSpeech conformer-wenetspeech | 9.79% |
| MagicData 4 speakers #2372 | SpeechBrain wav2vec2-ctc-aishell | 15.911% |
| MagicData 4 speakers #2372 | Whisper large-v2 baseline | 24.747% |
핵심 발견: 중국어 추론에서 PaddleSpeech가 Whisper보다 우수한 성능을 보인 반면, Meta MMS의 중국어 전사 결과는 Whisper보다 열등했습니다.
6. Azure Speech Studio
Azure AI Speech Services는 Microsoft Azure가 제공하는 클라우드 기반 음성 관련 서비스 모음입니다. Speech Studio의 Custom Speech 프로젝트는 다양한 언어로 생성할 수 있습니다.
a. 데이터셋 업로드
학습 및 테스트 데이터셋 업로드에는 세 가지 방법이 있습니다:
- Speech Studio (직접 업로드)
- REST API
- CLI 사용
Azure Blob Storage:
| |
오디오 형식 요구사항:
- 형식: WAV
- 샘플링 레이트: 8kHz 또는 16kHz
- 채널: 모노(단일 채널)
- 압축: ZIP 형식, 2GB 이하, 10,000개 파일 이내
b. 모델 학습 및 배포
| |
c. Azure 결과
| 테스트 데이터셋 | 학습 데이터셋 | 오류율 (커스텀 / 베이스라인) |
|---|---|---|
| MagicData 9452 11:27:39s | Aishell 12시간 이상 | 4.69% / 4.24% |
| MagicData 9452 11:27:39s | Aishell+Minds14 32시간 이상: 1시간 이상 | 4.67% / 4.23% |
| MagicData+Aishell+CV13 8721 11:45:52s | Aishell+CV13 8시간 이상: 7시간 이상 | 2.51% / 3.70% |
| MagicData+Aishell+CV13 8721 11:45:52s | Aishell+CV13+Fleurs 8시간 이상: 7시간 이상: 9시간 이상 | 2.48% / 3.70% |
참고: 최적의 Azure 모델은 AISHELL-1, mozilla-foundation/common_voice_13_0, google/fleurs로 학습되어 오류율 2.48%를 달성했습니다.
7. 향후 전망
핵심 발견과 향후 방향:
- 데이터 소스: 고품질 전사를 갖춘 중국어 음원은 영어에 비해 입수가 훨씬 어려움
- 하드웨어 제약: 멀티 GPU 학습 또는 고성능 GPU(NVIDIA 40 시리즈) 활용으로 대형 모델에서 더 좋은 결과 기대
- LoRA 구성: 서로 다른 LoRA 파라미터가 PEFT 모델 성능에 미치는 영향에 대한 추가 연구 필요
- 화자 분리: Pyannote.audio와 Whisper 통합이 가능성을 보이지만, 다중 화자 회의 시나리오에서의 정확도는 아직 부족
- Azure Speech Services: 고품질 오디오와 단어 수준 정확한 전사 유지가 핵심. 품질이 낮은 학습 오디오 필터링이 모델 성능 향상에 기여
8. 참고 문헌
- Anaconda, Inc. (2017). Command reference - conda documentation. conda.io/projects/conda/en/latest/commands
- OpenAI (2022, September 21). Introducing Whisper. openai.com/research/whisper
- Radford, A., Kim, J.W., Xu, T., Brockman, G., McLeavey, C., & Sutskever, I. (2022). Robust Speech Recognition via Large-Scale Weak Supervision.
- Gandhi, S. (2022, November 3). Fine-Tune Whisper for Multilingual ASR with Transformers. huggingface.co/blog/fine-tune-whisper
- The Linux Foundation (2023). Previous PyTorch Versions. pytorch.org/get-started/previous-versions
- Hugging Face, Inc. (2023). Hugging Face Documentations. huggingface.co/docs
- Srivastav, V. (2023). fast-whisper-finetuning. github.com/Vaibhavs10/fast-whisper-finetuning
- Mangrulkar, S., & Paul, S. (2023). Parameter-Efficient Fine-Tuning Using PEFT. huggingface.co/blog/peft
- Bredin, H., et al. (2020). pyannote.audio: neural building blocks for speaker diarization. ICASSP 2020.
- Bain, M., Huh, J., Han, T., & Zisserman, A. (2023). WhisperX: Time-Accurate Speech Transcription of Long-Form Audio. INTERSPEECH 2023.
- Meta AI (2023, May 22). Introducing speech-to-text, text-to-speech, and more for 1,100+ languages. ai.meta.com/blog/multilingual-model-speech-recognition
- Pratap, V., et al. (2023). Scaling Speech Technology to 1,000+ Languages. arXiv.
- Zhang, H. L. (2022). PaddleSpeech: An Easy-to-Use All-in-One Speech Toolkit. NAACL 2022.
- Ravanelli, M., et al. (2021). SpeechBrain: A General-Purpose Speech Toolkit.
- Gao, D., et al. (2022). EURO: ESPnet Unsupervised ASR Open-source Toolkit. arXiv:2211.17196.
- ESPnet (2021). espnet_model_zoo. github.com/espnet/espnet_model_zoo
- Microsoft (2023). Custom Speech overview - Azure AI Services. learn.microsoft.com/en-us/azure/ai-services/speech-service/custom-speech-overview
- Microsoft (2023). Speech service documentation. learn.microsoft.com/en-us/azure/ai-services/speech-service/